Příprava zařízení OneMeter
Než začnete
Doufáme, že jste si již přečetli Přehled systému
Varování
Ujistěte se, že vám blikající světlo nezpůsobuje zdravotní potíže.
Příprava na instalaci
- Stáhněte si mobilní aplikaci OneMeter do svého telefonu.
- Otevřete aplikaci OneMeter.
- Přihlaste se pomocí účtu Google / Facebook / (Apple - zatím nedostupné)
- Vyjměte nový OneMeter z obalu. Zařízení by se mělo probudit, když je vystaveno světlu. Pokud je v místnosti příliš tma, použijte svítilnu telefonu.
-
Zkontrolujte, zda má telefon povolený přístup k internetu, Bluetooth a služby určování polohy GPS.
Varování!
Služby určování polohy GPS musí být povoleny alespoň po dobu komunikace telefonu se zařízením OneMeter. Je to nutné pro platný přenos dat (souvisí se standardem Bluetooth Low Energy).
-
Sledujte blikající bílou diodu na OneMeteru. Tento stav znamená, že je zařízení připraveno k instalaci.
Vypnuto Zařízení je v režimu spánku. Chcete-li jej probudit, vystavte spodní část světlu. Bliká zeleně Zařízení se připravuje na proces instalace. V této fázi nevyjímejte baterii. Bliká bíle Zařízení je připraveno k instalaci na elektroměr. Po 1 minutě nečinnosti se zařízení vrátí do režimu spánku. Každou vteřinu blikne červeně Kritický stav baterie nebo chyba zařízení. Pokud výměna baterie nepomůže, kontaktujte nás. Bliká/svítí modře Tento stav by neměl nastat. Prosím kontaktujte nás. Instalace
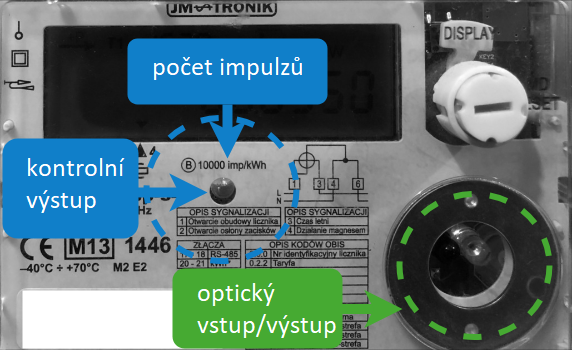
Rozlišujeme dva přístupy k instalaci podle toho, který port elektroměru se používá. Zařízení může buď číst data z elektroměru nebo počítat výkon a spotřebu energie na základě blikání LED diody (tzv. kontrolní výstup). Popis podporovaných portů elektroměru je uveden na obrázku příkladu elektroměru níže.

Zařízení lze instalovat vždy pouze jedním z přístupů!
Po instalaci nelze porty volně přepínat. Pokud chcete zařízení nainstalovat na druhý port, musíte jej nejprve odinstalovat a poté znovu nainstalovat podle příslušné části tohoto návodu.
Instalace na optický port
Vyhovuje protokolům IEC 62056-21 a SML.
- Připravte zařízení k instalaci.
- Ujistěte se, že máte povolenou funkci Bluetooth, GPS a také připojení k internetu.
-
Přibližte se co nejblíže k elektroměru.
Ujistěte se, že zařízení dokonale zapadne.
-
Proces instalace zahájíte stisknutím tlačítka "Přidat nové zařízení" ve spodní části obrazovky.
-
Postupujte podle pokynů na obrazovce. Během instalace ověřte stav zařízení.
Bliká zeleně (pravidelně) Zařízení je připojeno k telefonu. Chcete-li jej nainstalovat na elektroměr, postupujte podle pokynů na obrazovce. Bliká zeleně (nepravidelně) Probíhá proces instalace. Počkejte. Zařízení z elektroměru nesundávejte. Bliká červeně Vybitá baterie. Pro další odečty, instalaci či synchronizaci je nutné ji vyměnit. 1 nebo 2 červené bliknutí Při komunikaci s elektroměrem nebo při přenosu dat došlo k chybě. Bliká nebo svítí modře Tento stav by neměl nastat. Prosím kontaktujte nás. -
Hotovo!
Počkejte několik čtvrthodin a zkontrolujte svůj svůj energetický profil.
Installation on blinking LED
This is suitable for the BLINK protocol only.
In this mode, the beacon is capable of measuring live energy and power consumption. The measurement is updated on the cloud within a few seconds so you can observe the load of your local grid live, apart from the standard 15-min period. The higher the power, the more quickly you will see an effect.
- Prepare the device to be installed.
- Make sure you have the Bluetooth and GPS enabled as well as have internet connection.
- Get closer to the energy meter.
-
Locate the blinking LED (so called control output). Likely, it will be placed close to the number of pulses printed on the meter (for example: 1000 imp/kWh).
What if I don't see such a value?
You can try to search for energy meter pulse constant in the documentation of your meter. In case of problems, feel free to contact us. If possible, we will prepare the list of pulse constants depending on meter model and share it with all the clients.
-
Note down the number of pulses in kWh (convert if needed).
- Attach the blinking LED sticker to the meter so that the LED of the meter can be seen through the hole in the center.
- Attach the device to the sticker.
-
Observe the pulse detection process. To speed up the process you can turn on any home appliance which has high power consumption for a while. When the device shines green, it is ready to be installed.
You may need to slightly move the device to correctly place the light detector over the diode.
Pulsing green faster The meter communication protocol has been detected potentially. Wait a moment. 1 blink red Error in meter communication protocol detection. The device will come back to waiting for meter communication protocol detection. Blink white on solid green Meter communication protocol was detected. Every white blink is showing a confirmation of its correct placement. The device is waiting for the installation process. After one minute of inactivity, the device will return to sleep mode. If the quality of communication degrades, device goes back to dimming. Solid red Low battery. It must be replaced for further meter readings, installation and data synchronization. -
Start installation process by pressing the "+" button at the bottom right of the application.
- After you connect to the device, a new window will appear - input the previously noted number of pulses and continue.
-
Follow the on-screen instructions. Verify the device state during the installation.
Blinking green (stable) The device is connected to the phone. To install it on the meter, follow the instructions on the screen. Blinking green (variable) Installation process in progress. Wait. Do not remove the device from the meter. Blinking red Low battery. It must be replaced for further meter readings, installation and data synchronization. 1 or 2 red blinks An error was encountered during communication with the meter or during data transmission. Blinking/solid white or blue This state should not occur. Please contact us. -
You're done
Wait a couple of quarter hours (15 minute intervals) and check your energy profile.
Poslední aktualizace: 2024-12-23


