Thanks to OneMeter, you can easily monitor the energy you consume and return back into the grid at home or at the office. Via the OneMeter API, you can pull energy data into your Home Assistant installation in real time.
So, you have a great Home Assistant set up, but are still lacking energy consumption data? In this article, we’ll show you how to easily integrate Home Assistant with the OneMeter API, so that data from the OneMeter Cloud can be directly pulled into your smart home. Let’s get started!
This entry is a continuation of the “Smart Home with OneMeter” series. If you are looking for information about openHAB integration, you can find it here.
Outline
- Obtaining your device ID and API key
- Configuration
- Rest Sensor
- Template Sensor
- Lovelace
- Extras
- Utility Meter Component
- Lovelace Mini Graph Card
1. Obtaining your device ID and API key
- <DEVICE_ID> You can find the device ID at the bottom of your OneMeter device preview page on the [OneMeter Cloud] (https://cloud.onemeter.com/) platform (the UUID row in the Device Details table).
- <API_KEY> Can be found at https://cloud.onemeter.com/#/api. If you do not have access to this section, please contact us and we will promptly give you access to the API.
Below is an example of the address that we will be using to download the relevant values from the OneMeter Cloud: https://cloud.onemeter.com/api/devices/<DEVICE_ID>?key=<API_KEY>
Be sure to remove the symbols
<&>!
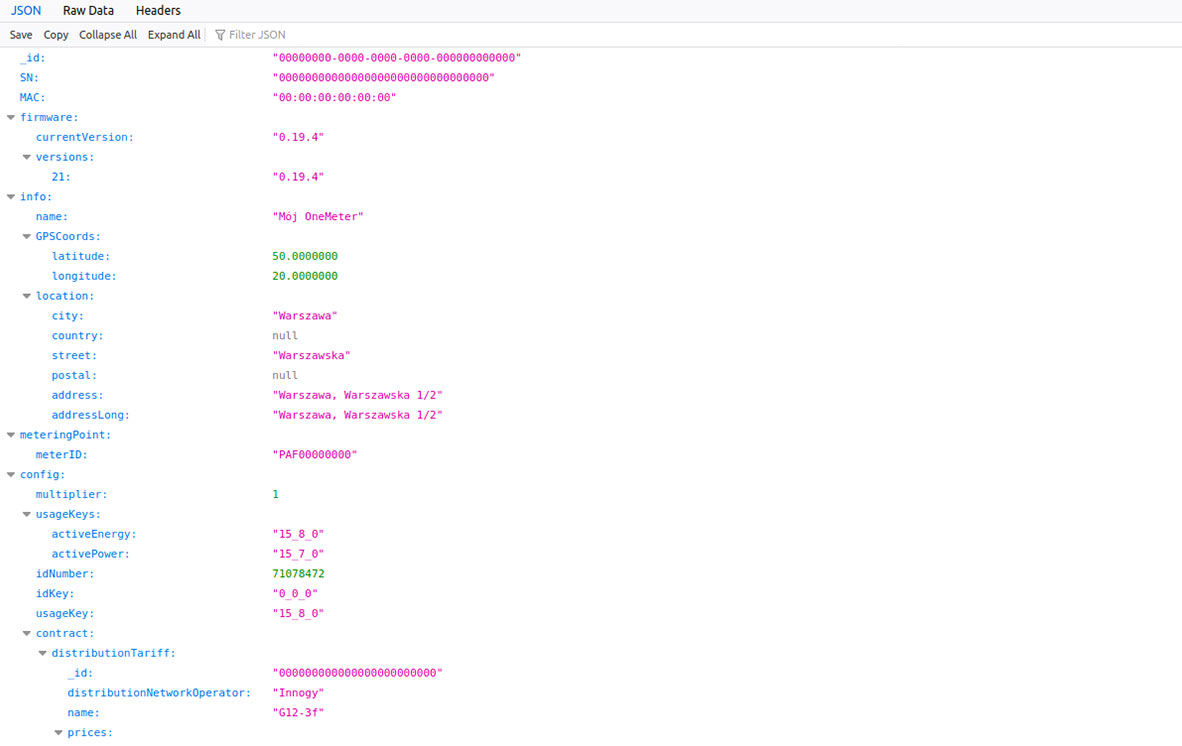
To check if the link we have created is error-free, paste it into your browser. If we have managed to do this step correctly, we should get a result similar to this:
2. Configuration
Let’s move on to defining the HASS sensor. It will allow us to communicate with the OneMeter Cloud by pulling energy values collected by your OneMeter device. This will be done through the OneMeter API, which makes all collected data available. W just need to create the sensor by pasting the code as in the example below into configuration.yaml:
configuration.yaml
- platform: rest
  scan_interval: 900
  name: OneMeter
  resource: https://cloud.onemeter.com/api/devices/<DEVICE_ID>
  value_template: "{{ value_json.lastReading.OBIS['1_8_0'] }} {{ value_json.lastReading.OBIS['S_1_1_2'] }} {{ value_json.lastReading.OBIS['S_1_1_4'] }} {{ value_json.usage['thisMonth'] }} {{ value_json.usage['previousMonth'] }} {{ value_json.firmware['currentVersion'] }}"
  force_update: true
  headers:
    Authorization: <API_KEY>

- platform: template
  sensors:
    onemeter_kwh:
      friendly_name: "kWh"
      unit_of_measurement: "kWh"
      icon_template: mdi:flash
      value_template: "{{ states.sensor.onemeter.state.split(' ')[0] }}"
    onemeter_voltage:
      friendly_name: "OneMeter Battery Voltage"
      unit_of_measurement: "v"
      icon_template: mdi:battery
      value_template: "{{ states.sensor.onemeter.state.split(' ')[1] }}"
    onemeter_timestamp:
      friendly_name: "OneMeter Last Readout"
      icon_template: mdi:clock
      value_template: "{{ states.sensor.onemeter.state.split(' ')[2] }}"
    onemeter_this_month:
      friendly_name: "Current Consumption"
      unit_of_measurement: "kWh"
      icon_template: mdi:calendar-month
      value_template: "{{ states.sensor.onemeter.state.split(' ')[3] }}"
    onemeter_previous_month:
      friendly_name: "Previous Consumption"
      unit_of_measurement: "kWh"
      icon_template: mdi:calendar-month-outline
      value_template: "{{ states.sensor.onemeter.state.split(' ')[4] }}"
    onemeter_firmware:
      friendly_name: "OneMeter Firmware Version"
      icon_template: mdi:chip
      value_template: "{{ states.sensor.onemeter.state.split(' ')[5] }}"
Be sure to remove the symbols
<&>!
The configuration of the user interface is done through lovelace by copying the following into ui-lovelace.yaml:
ui-lovelace.yaml
- cards:
  - entities:
      - entity: sensor.onemeter_kwh
      - entity: sensor.onemeter_previous_month
      - entity: sensor.onemeter_this_month
      - entity: sensor.onemeter_timestamp
      - entity: sensor.onemeter_voltage
      - entity: sensor.onemeter_firmware
    show_header_toggle: false
    title: OneMeter Energy Usage
    type: entities
Reload your HASS instant and after viewing your dashboard, you should be presented with this:
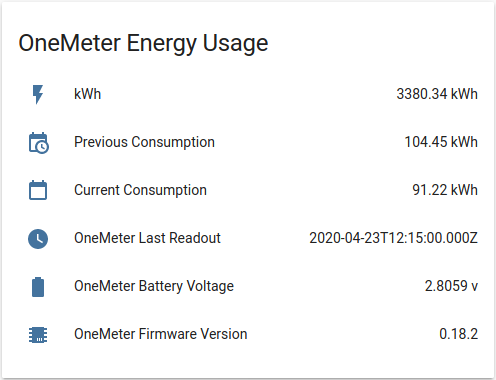
That’s it! If you got all the way here, you’ve integrated OneMeter into Home Assistant.
3. Extras
Utility Meter Component
The Utility Meter component provides the functionality of tracking the consumption of different utilities (e.g. energy). This component tracks values and automatically resets the meter based on the configured cycle.
configuration.yaml
utility_meter:
  hourly_energy:
    source: sensor.onemeter_kwh
    cycle: hourly
  daily_energy:
    source: sensor.onemeter_kwh
    cycle: daily
  weekly_energy:
    source: sensor.onemeter_kwh
    cycle: weekly
  monthly_energy:
    source: sensor.onemeter_kwh
    cycle: monthly
  yearly_energy:
    source: sensor.onemeter_kwh
    cycle: yearly
ui-lovelace.yaml
- cards:
  - entities:
      - entity: sensor.hourly_energy
      - entity: sensor.daily_energy
      - entity: sensor.weekly_energy
      - entity: sensor.monthly_energy
      - entity: sensor.yearly_energy
    show_header_toggle: false
    title: OneMeter Energy Usage
    type: entities
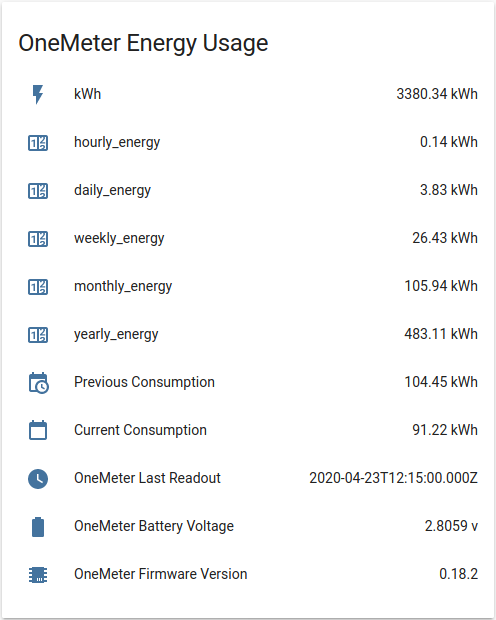
Lovelace Mini Graph Card
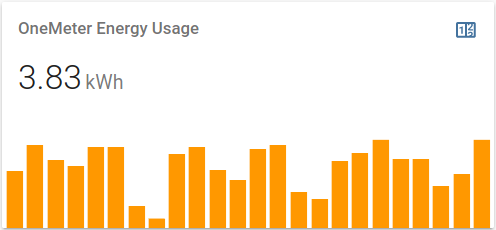
Thanks to Mini Graph Card, we can create graphs that allow you to quickly compare energy data obtained from OneMeter. The card can be installed using HACS.
ui-lovelace.yaml
- cards:
    - entities:
        - sensor.hourly_energy
      hour24: true
      hours_to_show: 24
      name: OneMeter Energy Usage
      points_per_hour: 1
      show:
        graph: bar
      type: 'custom:mini-graph-card'
If you have any problems, questions or suggestions, please contact us via our contact form - we will be happy to help!
